Copyright

Any work from the inception of this blog is under Copyright of Charlie Rotherham.


Any re-blogging of any work from this blog should contact me before posting/ publishing said post.


Tuesday 19 March 2013

Design Principles: 'Mop Up and Submission'

From the last session, we were given question as groups to answer. Each group had to present their findings to the class in order to initiate a discussion from the full group. We had to take notes from each groups presentation. My Group based ours on What Is The Golden Section?

What is Grids, Columns and Gutters?
  • Gutter- Space between the columns
  • Columns- Vertical lines used to space out content
  • Grids- Used to proportion and organise information on a page to create a balanced design
What Is Point, Pixel and Pica?
  • Point- Measurement of type/ of a font
  • Pixel- Sample of an image. The Smallest controllable bit of your image
  • Pica- 12 points to a Pica. 3 types of Pica- French, USA and Computer
  • 8-bit- Digital images made of RGB
  • 16-bit- Edit of digital image
What is Drop Caps, Folio, Box and Rulers?
  • Drop Caps- In old Bibles, there would be an illustration of the chapter starting letter with text underneath. Signifies the break in a text.
  • Folio- Numebrs at bottom of the page, date or name of book (like a footer)
  • Box and Rulers- Form and Layout. Using software to create aid guides on a page.
What is DPS and what does it do?
  • Double Page Spread- Different depending on the usage. Magazine is centre spread. Advertising will only use a double page spread for a new product
What Is Layout, Pagination, Sub-Heading, Caption and Ligature?
  • Layout- The way your book is presented so the eye can read across the page
  • Pagination- Splitting a page- Numbers at the bottom. Dividing content into pages both electronically and printed. Consideration for semantics and cultural contexts
  • Sub-Heading- Split heading so it gives a deeper meaning, One or more sentences
  • Caption- Hook Line- draws attention to detail in the image
  • Ligature- Represents a character. Makes type look more attractive on a page. Smoother transaction between the letterforms.
Other words that came up which we need to know is Greeking, Folio Numbers, Ligatures, Measures and Rules and Boxes

Crit:

From my tester piece, I was given the opportunity to get feedback via a Crit process that we had during Design Principles where we had to show any work we had done based on grids and layouts. We left out a sheet which people could use to write some feedback anonymously. Each person needed 4 responses.
Crit Display
From this, I gained anonymous and honest feedback in regards to what I had produced.

Crit Feedback
The main consensus was that I got positive feedback but I also got some welcome constructive criticism. The main points and only issue was about my lack of a Heading. Another interesting point that I hadn't noticed was that I have my paragraphs separated with a line between them and someone said to block them together to make it neater. Due to the fact that I hadn't thought or noticed this myself, I felt that I would react to this.

Study Task:

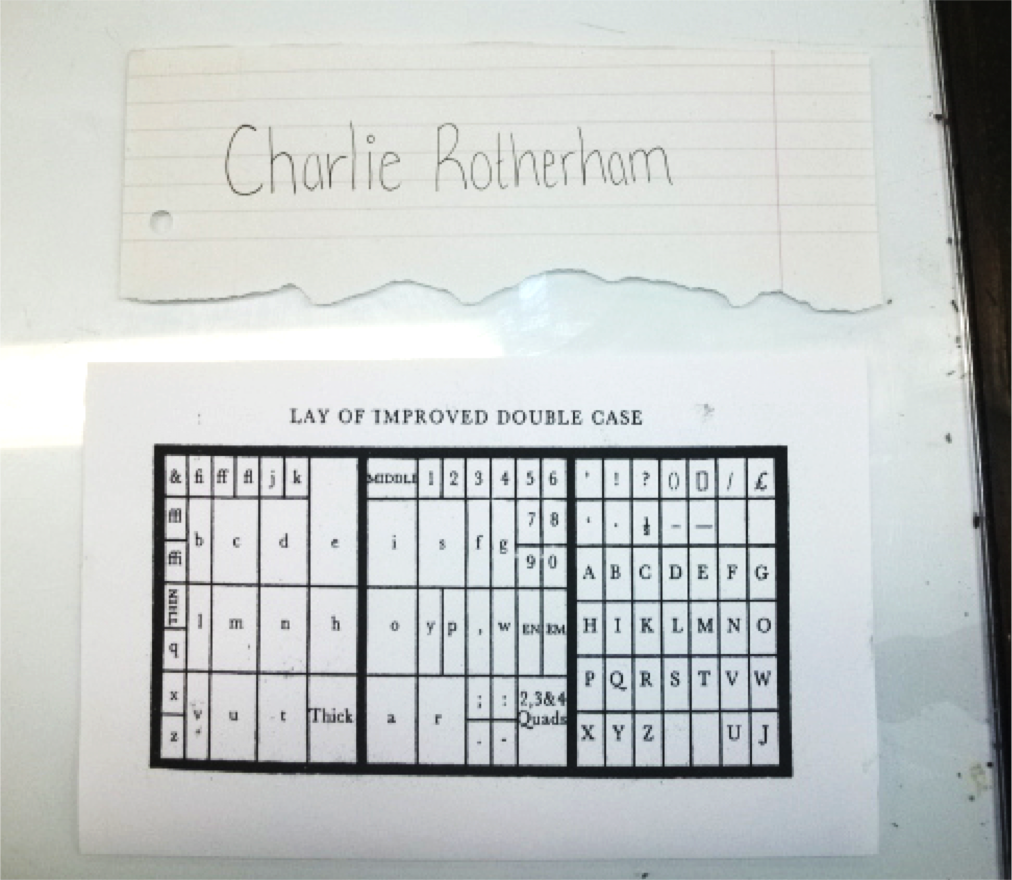
From the questions we were given, we have to be able to answer what each technical language word means and do our own research into each thing.
List of Things To Know
We also need to know the terms 'Greeking' and 'Ligatures' from the previous questions. I am going to give an example of each one using a made up layout in InDesign in order to demonstrate what they are.

DPS- Shorthand for Double Page Spread. It is 2 pages which are facing each other. Usually this is for a main article within a magazine or a newspaper to make more of an impact.

Double Page Spread in InDesign
This is known as a centre spread when it is in the middle of the publication. Textual material is usually started on the left hand side and moves to the right as there is usually a large amount of content.

Grid- A systematic separation of a page that is equal throughout to produce a consistent layout with even gaps.
5 x 5 Grid in InDesign
Grids are normally used to be able to create a balanced layout by organising where text and image would go, making sure it would be within the bleed and trim lines and acting as a measurement to determine placement of componants.

Gutters- Equal Spacing between the columns that aids the readability of any body copy.

Gutters on Grid in InDesign
Gutter in an InDesign Double Page Spread
Gutter can also refer to the space which binds the 2 facing left and right pages together in a double page spread. Can also be referred to as an Alley. 

Margins- The marked out space which isn't to be printed. This creates a sort of frame to work from and work around, putting the contents into the area within the margin.
Margin on an InDesign Double Page Spread
Different sized margins can be used for different amounts of emphasis onto an image or text. Normally the space outside of the margins is saved for putting additional information in, e.g.. page numbers.

Rules and Boxes- Rulers are along the side of the document which are used to produce an accurate measurement when marking out placement, aiding the layout of the page.

Rules and Boxes in use on InDesign
Boxes are created to mark out where the content of the layout is going from the rules and guides.

Columns- Vertical style, even spaces that are used to hold contents for the layout within an organised, balanced manner.
Columns reserved for Text in InDesign
The amount of columns used is based on the purpose of the layout and what the designer is trying to get across.

Greeking- A Software device which is used to produce areas of grey where text is going to be placed.

Placeholder Text for Greeking in InDesign
This can also be filled with dummy or placeholder text until the actual final text is available. This allows the designer to check whether the layout actually works.

Images- Pictures that are used to visually illustrate the subject matter or purpose of the layout.

Image Placed in InDesign
They are usually placed in a way where the image either mirrors or interacts with the text so that there is an equal balance amongst the layout.

Captions- Also known as a Cutline. The text is usually found underneath an image that makes a reference to it.
Caption included on image in InDesign
The information may be from the images source or giving a description. They are often overlooked and are normally used as a function rather than a decorative aspect of the design.

Paragraphs- The way large amounts of body copy text are laid out in blocks so as to ease the readability of the text.

Paragraphs in Text on InDesign
By using paragraphs, it makes the information easier to digest and allows for particular topics to be put together and separated.

Ligatures- Letters that are put together, joined in a single unit of type.

Use of Ligature in text 
This joins them together so there is a connection between them physically, using one to make the other readable.

Drop Caps- A large initial letter at the start of a piece of text that drops into the line of text beneath causing an indentation into the normal sized text.

Use of Drop Caps on InDesign
Usually used for emphasis, reader orientation or ornament to decorate the text visually.


Headlines- Usually placed at the top of a page using the largest font size throughout the whole of the layout in a bold thickness.
Heading used in InDesign Layout
This captures the eye of the audience and draws them in. Orientates the reader and informs them of the subject matter of the spread straight away.

Sub-Headings- Usually a sentence or two underneath the main headline in a smaller font size. A slightly different yet complimentary font may be used to differentiate between the heading and sub-heading.
Sub-Heading for Layout in InDesign
Gives a deeper meaning to the text and gives a short summery of the purpose of the layouts contents. It is not to overpower the heading.


Pagination- The numbering of pages in a book. Usually at the bottom of a page.

Pagination of Page Layouts in InDesign
They are usually referenced in a bibliographical sense to give orientation to the information.


Folio Numbers- Folio is referenced to the number information on a page. This is generally the page number but this can stretched to the name of a chapter, article and publication alongside the date.

Information alongside page number in InDesign
It is a way of organising and managing the amount of pages that make up the publication.

Measures- Denotes column width, expressed in Picas.


Measures in InDesign

It is also a reference to the measurement types available such as type size, page size and image size within the layout.

Imposition- The way that an arrangement of printed pages have been put together which will cause them to be in the right order.
Imposition of Crop Marks in InDesign
This usually includes design choices such as using double sided printing, trim or crop marks or page numbers.
Layout including all aspects of Terminology
When researching, I found that these websites were particularly useful. In regards to the content and the exhaustive dictionary that it holds, http://www.brochure-design.com/brochure-printing-glossary.html is helpful in need- to- know terminology. In regards to demonstration of headings and sub-headings, this blog by http://wedesignstudios.com/2012/10/choosing-typefaces/ is particularly useful as it gives a visual demonstration in how different fonts and typeface sizes work together.

Monday 11 March 2013

Letterpress Induction

From this Letterpress induction, the aim was to be able to print our name using a typeface by setting it and printing it.

The first thing we did was select a typeface to use between a group of 3. Between us, we decided to go for Times in 20pt so that would give a nice clean legibility of the type.

Times 20pt Movable Type
We needed to write our names down on a sheet of paper as a reference guide due to the fact that we would be working with the letters being upside down and backwards.

Reference Guide
We went onto laying out our names in the movable type. We had to use a composing stick with a piece of leading at the bottom to place the type on. Once the type has been laid out, the line of type needs to be filled up by spacing 'quads'.

Composing Stick with Movable Type
From that, the names were imposed onto a frame that was loaded and surrounded by blocks that packed the frame with added weight. This was to stop the type from moving when being printed.
Set up Type
Using the Letterpress, the type is set onto the machine itself and ink is placed onto the rollers so as to spread the ink evenly. The choice of paper used has to be preferably thin so that it doesn't become embossed and is packed with added sheets of newsprint.

Set Up Letter Press and Printing
We went onto producing 5 prints each using different papers: Cartridge paper, Photo paper, Tracing paper, Off White Newsprint paper and Tissue Paper.


Printed Papers with Names
From this, we then had to wash off the ink from the block of text using white spirit to get rid of the ink and then replace the type in the select drawers.

Cleaning off the Ink

Finished Prints:

5 Letterpress Prints using different stocks in order to experiment and develop out Printing skills.


Individual Prints
Prints Altogether
This induction helped with understanding why designers need to understand kerning and leading when producing printed type and I liked the quality of the prints as it gave them an authentic aesthetic.

Thursday 7 March 2013

Screen Print Induction

The aim of the screen print induction was for us to have a go at screen printing in a 4-ink CMYK print for ourselves. I have never took part in making something via the act of Print Screening so I wanted to make sure that I got involved and had a go for myself.


Preparation for Screen Printing
We needed to set up the boards for print screen by adjusting the sizes and tightening them down so that when they are being lifted and printed on, they don't move. Gaffer Tape is then used to go around the area that you are printing on so that the ink doesn't run and go all over the surface area. Using a layer of aescitate to be printed over the top of so as to determine the print quality and print placement, you can measure whereabouts you need to put your paper from underneath. As for the printing technique, you have to use 30% acrylic and 70% binder for the paint and put a large pool of it on the screen. Lining up the paper, you use a vacuum to hold the paper in place. Using a large squeegee, you need to push the paint towards you and then, when lifting up the screen, push it away from you. For the second, third and fourth layers, you use the printing dot markers to make sure you get the right overlay each time.

Yellow First Layer
Magenta Second Layer 
Cyan Third  Layer
Key Fourth and Final Layer
We cleaned the boards and put away the rest of the ink which gave the ink time to dry. In the print session, we had made 2 prints so I used one to keep flat and another to produce a hot-dog book.


Trimmed Down, Cut down the Middle and Folded
To make a hot dog book, we needed to trim the page down and cut down the middle with a scalpel. Then we needed to fold the paper down the seams to make the book shape.


Finished Hot Dog Book- Front and Back
I managed to make the hot dog book successfully and I think the printing quality made it appear quite homely and inviting due to the handmade quality of the printing.